Thursday 24 October 2013

Windows 8 Activator for All Editions

0 comments

Windows 8 Activator for All Editions (Guaranteed) !!!


Problems regarding activation of Windows 8 has been solved last year. Those who are the users of Windows 8 and having trouble to activate this version of Windows hope you already got the solution. Just after the release of the final version of Windows 8, we have provided an activator for you that works with all editions. 


At least 70% of the comments were positive about that activator. And unfortunately 30% of them were negative. They reported this activator was not working for them. And we promised if we can manage a new activator we will inform them. Today I will share another activator with you with proof! 


This activator works same as the previous one. All you is just to make a double click on the activator. Within 10/ 15 seconds your PC will be restarted. And you will see the confirmation message about Windows 8 activation. 

Okay let's start. This is a very simple and easy activator. First, download the file by hitting on the download button: 

Download

  1. After download the file you need to unzip it. 
  2. Then double click on the activator. 
  3. Wait for few seconds for processing.
  4. Now your system will be restarted and you will get the activation message. 


Cautions: 
  • Windows Defender may detect this file as virus. I think as it is a cracking tool that's why defender may consider this as a threat. But this is safe (Though I'm not 100% sure but using it on my PC).  
  • .Net Framework 3.5 is required to run this activator. If your Windows doesn't have .Net 3.5 installed then install it now. 
  • Make sure, your Windows Automatic Update is turned off.
  • For any reason, if this activator doesn't work, then you follow this method. 

After successfully activating the Windows, you will be shown the confirmation message. And you can also find it by pressing Start + Pause as the image shows below: 


Windows is Activated message at Windows Activation Window

Most of our visitors found the previous activator useful. But some of them were unable to activate their Windows. That's why we've shared this new activator. But you can also try the previous one. 


Activate Windows 8 Just by Double Click (All Versions) !!!


It has the following advantages: 
  • .Net Framework 3.5 is not required to run the activator.
  • Just hit and activate. 

Disadvantages:

  • Quite useful but depends on luck sometimes. (10% of the attempts were not successful)
  • Sometimes you might not see the Windows is Activated message in the Activation Window.
  •  May not work if your Automatic Update is Enabled

Troubleshooting Tips:

Many of our visitors have reported that this doesn't work at all. Instead of activating Windows, after rebooting, they got only black screen! 

If you wanna get rid of this problem, please don't install any other third party security software like Avast, Norton or Kaspersky. Built in security of Windows 8 will take care your PC.
How to Make Money from Your Blog

0 comments

How To Remove Blogger Attribution Gadget

0 comments

  How To Remove Blogger Attribution Gadget


The Attribution gadget is the gadget in the footer that says "Powered By Blogger". If you have tried to remove this then you may of noticed this gadget is locked into you blog. To unlock it, follow the next steps:
blogger attribution, blogger hacks, powered by

Step 1. Log in to your Dashboard, go to Template > Edit HTML


Step 2. Check the "Expand Widget Templates" box


Step 3. Search (CTRL+ F) for this code:Attribution'>

<b:widget id='Attribution1' locked='true' title='' type='Attribution'>

Step 4. Replace true with false (past false)

Step 5. Click on the Save Template button

Now attribution gadget is unlocked and it can be removed. Just go to:

  • Layout and click on the edit link from Attribution gadget:
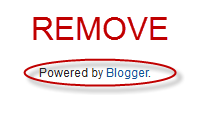
  • Click on the Remove button - as you can see in the screenshot below:

How to get free CU.CC Domain URL

0 comments
You might be tired of your free hosting Domain URL.In this post I am gonna show you how to get free cu.cc (E.g. xxxxx.cu.cc)domain for your site.Yester day i came across the site which provide free domain name(s) for 2 years for free.So I tried to register my blog there and it's very easy.Here is the step to get free domain name

Step-1:

First of all check availability of Domain Name(Enter name of domain in text box below):


Step-2:

If you find it available, Select "register 1 year "or "register 2 year" and Click on "Ckeckout".See Below:

Step-3:

Sign up for new account.And then Sign in to your account.Now you have to redirect this URL to your free hosting site URL(E.g. xxxxx.yyyyy.com).For this Click on "My Domains".You will see your domain URL there(E.g. xxxxx.cu.cc).

Step-4:

Click on Pencil tools immeadiately after URL.

Step-5:

Click on "URL Forwarding".Now fill details.Then Click on "Setup URL forwarding".

Step-6:

Now you just type your new URL into Address Bar of your browser. You will see your website there. That's it!

How to Improve Your Website's Google PageRank

0 comments
Now to Increase your Website rank in Google search there are many option available in Google webmaster Tool.We will continue from the last post. Go to your Webmaster Dashboard.

  • Click on "Health" option on left panel of the window.
    • Click on "Fetch As Google" .
    • Then enter URL of the Specific page.
    • You can select from Four option available. Then Click on fetch.
    • In the list Below Click on "Submit to index".
    By doing this Google will fetch your page as Google bot and will index your page.
  • Next, Click on "Index Status".
    • This will show you total Index Page of your site. By clicking on Advanced Tab you can see detailed Graph of your indexed page
  • Click on "Traffic" option. Here you will see three option.
    • "Search Queries" option will show keyword that Indexed your Website OR page on Google Search Result.
    • "Links to Your Site" option will show you Backlinks to your site.
    • "Internal links" will show you Link to your site from(various pages of)your site.
  • Next,Click on Optimization > Sitemaps.
    • Enter URL os Sitemap and Click on "ADD/TEST SITEMAP".
    • If your website is Blog on Blogspot.com Then Default sitemap is:/rss.xml(YourBlogName.bogspot.com/rss.xml) OR /atom.xml(YourBlogName.bogspot.com/Atom.xml).
    • Otherwise you can Generate Sitemap for your Website. It is very easy to Generate Sitemap. There are many other websites available which will Generate Sitemap for you. The One I Used is www.xml-sitemaps.com
    • After Generating Sitemap Upload it to The Directory in which your Index file is. And provide the URL.
    • Then refresh the page. You will see Number of Pages Index from your site.
There are many other option available Which you can explore by your self.


Copyright 2008 All Rights Reserved Revolution Two Church theme by Brian Gardner Converted into Blogger Template by Bloganol dot com